Category Archives: Xamarin.Forms

Creating a Flyout in Xamarin.Forms

Flyouts are a pretty neat control, first introduced in Windows UWP, but there is nothing close in Xamarin.Forms which can be used on all platforms. So I decided to create one.

What is a Flyout?

from the Windows UWP documentation (https://docs.microsoft.com/en-us/uwp/api/windows.ui.xaml.controls.flyout?view=winrt-19041)

“Use a Flyout control for collecting information, for displaying more info, or for warnings and confirmations. Unlike a dialog, a Flyout does not create a separate window, and does not block other user interaction.”

So a Flyout can be attached to whatever control you want, and it will pop up as soon as the item is tapped. There are several use cases it easy fits in:
– show more details in a specific context
– ask for confirmation
– ask for more details
– …

How will the XAML look like?

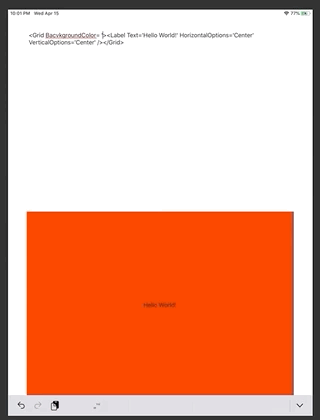
<Label Text="Hello who?">
   <FlyoutBase.AttachedFlyout>
      <Flyout BackgroundColor="Red">
          <Flyout.DataTemplate>
               <DataTemplate>
                  <Label Text="Hello World!"/>
               </DataTemplate>
          </Flyout.DataTemplate>
      </FLyout>
   </FlyoutBase.AttachedFlyout>
</Label>

Looks easy to use, but still needs to be implemented.

Main Challenge: Create a layer over the current content for our Flyout

First we need to add a layer over the whole content of the page, so we can freely place a Flyout on the screen over all other controls. We can achieve that by going up the whole visual tree, find the ContentPage and kinda inject a Grid into it. A Grid is pretty easy to use, and it has the ability to have several Children that arrange in layers one over each other. We need to do this step, because we know nothing about the Layout that is used by the programmer, that created that Page.

FlyoutBase.AttachedFlyout is a AttachedProperty that we can attach to whatever control we need. After the Flyout is attached, we just need to add the TapGesture to that control.

internal class FlyoutRootGrid : Grid {}    // just a specific type, to remind it
public class FlyoutBase
    {
        #region attachedflyout property
        public static readonly BindableProperty AttachedFlyoutProperty =
            BindableProperty.CreateAttached("AttachedFlyout", typeof(Flyout), typeof(FlyoutBase), null, propertyChanged: OnAttachedFlyoutChanged);


        public static Flyout GetAttachedFlyout(BindableObject view)
        {
            return (Flyout)view.GetValue(AttachedFlyoutProperty);
        }

        public static void SetAttachedFlyout(BindableObject view, Flyout value)
        {
            view.SetValue(AttachedFlyoutProperty, value);
        }
        #endregion

        // called whenever a flyout is attached to a view
        private static async void OnAttachedFlyoutChanged(BindableObject bindable, object oldValue, object newValue)
        {
            if (bindable is View view)
            {
                await Task.Delay(1000); // we wait a little, so the view is attached to the visual tree
                // this is very weak, we need to think about a better solution here
                AttachFlyout(view);
            }
        }


        private static void AttachFlyout(View view)
        {
            // find the FlyoutRoot
            var flyoutRootGrid = CreateOrFindRootGrid(view);
            // and now attach the flyout to it as child
            var flyout = AttachFlyoutToRoot(flyoutRootGrid, view);
            // register the desture to the visual
            view.GestureRecognizers.Add(
                new TapGestureRecognizer
                {
                    NumberOfTapsRequired = 1,
                    Command = new Command(obj => ToggleFlyoutIsVisible(flyout, view))
                });
        }

        // will go through the visual tree up to the content page
        // remove the content
        // add a "FlyotRootGrid"
        // and set the removed content to it as first child
        private static FlyoutRootGrid CreateOrFindRootGrid(VisualElement view)
        {
            var flyOutRootGrid = VisualTreeHelper.FindParentElement<FlyoutRootGrid>(view);
            // maybe we already have such a control in the visual tree (perhaps we use more than one flyout)
            // so we can reuse it
            if (flyOutRootGrid == null)
            {
                // otherwise attach iot to root
                var parentPage = VisualTreeHelper.FindParentPage<ContentPage>(view);
                flyOutRootGrid = new FlyoutRootGrid();
                var oldContent = parentPage.Content;
                parentPage.Content = flyOutRootGrid;
                flyOutRootGrid.Children.Add(oldContent);
            }
            return flyOutRootGrid;
        }

        private static Flyout AttachFlyoutToRoot(FlyoutRootGrid flyoutRootGrid, View view)
        {
            // get the flyout from the attached property
            var flyout = GetAttachedFlyout(view);
            // not visible yet
            flyout.IsVisible = false;
            // add it to the root grid
            flyoutRootGrid.Children.Add(flyout);
            return flyout;
        }

        private static void ToggleFlyoutIsVisible(Flyout flyout, View view)
        {
            // align flout to the view that has been clicked
            // set IsVisible to the flyout
        }

    }

Now that the Flyout is added to the VisualTree of the ContentPage, we just need to handle the fade in and out of the Flyout. We also have to take care of placing the Flyout correctly on the screen. Therefore we need to find the screen coordinates of the tapped view and position the Flyout accordingly.

private static void ToggleFlyoutIsVisible(Flyout flyout, View view)
{
    bool setVisible = !flyout.IsVisible; // checkout the flyout is visible
    if (flyout.Content == null && flyout.DataTemplate != null)
    { // when we yet have no content -> create it from datatemplate
        flyout.Content = flyout.DataTemplate.CreateContent() as View;
    }
    if (setVisible)
    {
        flyout.AlignFlyout(view);
    }
    flyout.PlayAnimation(setVisible, view);
}

I don’t just want to set the IsVisible property. Let’s do something fancy and add an animation. But first we need to find the coordinates of the tapped control. I found a solution here (https://forums.xamarin.com/discussion/66386/how-to-get-the-coordinates-where-there-is-a-control-on-the-screen) and adjusted it a little to fit my needs. The VisualTreeHelper also includes the FindParentPage-method from a previous blog post.

public static class VisualTreeHelper
    {
        public static T FindParentPage<T>(Element view)
            where T:Page
        {
            return FindParentElement<T>(view);
        }

        public static T FindParentElement<T>(Element view, Func<T,bool> predicate = null)
            where T:Element
        {
           
            if (view is T element)
            {
                if (predicate == null)
                {
                    return element;
                }
                if (predicate(element))
                {
                    return element;
                }
            }
            if (view.Parent == null)
            {
                return null;
            }
            return FindParentElement<T>(view.Parent, predicate);
        }

        public static (double X, double Y) GetScreenCoordinates(this VisualElement view)
        {
            // A view's default X- and Y-coordinates are LOCAL with respect to the boundaries of its parent,
            // and NOT with respect to the screen. This method calculates the SCREEN coordinates of a view.
            // The coordinates returned refer to the top left corner of the view.
            var screenCoordinateX = view.X;
            var screenCoordinateY = view.Y;

            var parent = (VisualElement)view.Parent;
            while (parent != null && parent is VisualElement)
            {
                screenCoordinateX += parent.X;
                screenCoordinateY += parent.Y;
                parent = parent.Parent as VisualElement;
            }
            return (screenCoordinateX, screenCoordinateY);
        }
    }

Now we can put all together and implement the Flyout


public class Flyout : ContentView
    {
        public enum AnimationType { Fade, SlideVertical }
        public Flyout()
        {
            HorizontalOptions = LayoutOptions.Start;
            VerticalOptions = LayoutOptions.Start;
        }

        public AnimationType Animation { get; set; }

        public DataTemplate DataTemplate { get; set; }


        double _targetHeight = -1;
        internal async void PlayAnimation(bool setVisible, View view)
        {
            switch (Animation)
            {
                case AnimationType.Fade:
                    if (setVisible)
                    {
                        Opacity = 0;
                        IsVisible = true;
                        await this.FadeTo(1, 250);
                    }
                    else
                    {
                        await this.FadeTo(0, 250);
                        IsVisible = false;
                    }
                    break;
                case AnimationType.SlideVertical:
                    if (setVisible)
                    {
                        if (_targetHeight == -1)
                        {
                            _targetHeight = Height == -1 ? HeightRequest : Height;
                        }
                        HeightRequest = 0;
                        Content.Opacity = 0;

                        IsVisible = true;
                        var animation = new Animation(d => HeightRequest = d, 0, _targetHeight);
                        animation.Commit(this, "Flyout");
                        await Task.Delay(100);
                        await Content.FadeTo(1, 55);

                    }
                    else
                    {
                        await Content.FadeTo(0, 55);
                        var animation = new Animation(d => HeightRequest = d, Height, 0);
                        animation.Commit(this, "Flyout2");
                        await Task.Delay(250);
                        IsVisible = false;
                    }
                    break;
            }
        }

        internal void AlignFlyout(View view)
        {
            var coords = view.GetScreenCoordinates();
            Margin = new Thickness(coords.X, coords.Y + view.Height, 0, 0);
        }

    }

As always you can use and extend the code, however you like. It’s not complete yet, feel free to fix bugs or extend it.

How to find the root Page of a specific Control in Xamarin.Forms

Actually it’s very easy to achieve this. Just traverse the visual tree upwards to find the root.

 public static class VisualTreeHelper
    {
        public static ContentPage FindParentPage(Element view)
        {
            if (view is ContentPage page)
            {
                return page;
            }
            return FindParentPage(view.Parent);
        }
    }

This does what we intended to do, but… we can do better than that!
Maybe we don’t want to just find the (Content)Page, how about finding the root grid, or a parent of a specific type. We just need to take that function and convert it to a generic function, that’s all, and we are way more flexible.

public static class VisualTreeHelper
    {
        public static T FindParentPage<T>(Element view)
            where T:Page
        {
            return FindParentElement<T>(view);
        }

        public static T FindParentElement<T>(Element view)
            where T:Element
        {
           
            if (view is T page)
            {
                return page;
            }
            if (view.Parent == null)
            {
                return null;
            }
            return FindParentElement<T>(view.Parent);
        }
    }

User Access Management in Realm

As I already stated before, I love Realm.io. It’s a pretty cool object oriented database, with a very mighty synchronization mechanism, that helps you build mobile apps just right out of the box. But that’s not the end of the line.. It also ships with a very mighty user management feature.

When you develop mobile apps, you sooner or later want users to get authenticated. You need a user management, with registration, authentication, and permission management. That’s all but easy.

Realm delivers all of it, with some easy steps.

  1. User registration
    var usr = await User.LoginAsync(Credentials.UsernamePassword("Tom", "test", true), new Uri("realmUrl"));
    // an exception will be thrown, when the user already exists
  2. User login
    var usr = await User.LoginAsync(Credentials.UsernamePassword("Tom", "test", false), new Uri("realmUrl"));

Now that you have a user registered and logged in, you can create as many realms as you like. But you can only create realms with your UserId, in most cases this is not the Username. But don’t panic, you don’t need to store it somewhere. When you open a Realm, just add a Tilde, which will automatically get replaced with your UserId.

FullSyncConfiguration conf = new FullSyncConfiguration(new Uri("~/MyLittleRealm", UriKind.Relative));
var realm = Realm.GetInstance(conf);

Pretty easy, isn’t it? But that’s not all. Let’s assume we have an App to manage your shopping list. That’s probably enough, but you also want to share your shopping list with your wife or kids. Everyone using your App will actually have it’s own list, but can’t access the others. But you know what realms they are using, so you could synchronize them too, perhaps it is something like <UserId>/ShoppingList . But first of all you don’t have their UserId (this is not the username!) and also no permission to access it. A user needs to actively grant someone else access to their Realms:

await User.Current.ApplyPermissionsAsync(PermissionCondition.UserId("someonesUserId"), "~/ShoppingList", AccessLevel.Read | AccessLevel.Write);

You can even choose if the user can read or read and write your Realm. But how do we get the UserId?

There are two approaches to that challenge:

  1. you can store the UserId in a public realm, this is okay, but not a very secure solution
  2. your App can offer a way to directly send the UserId to others using WhatsApp, NFC or a QR-Code .. that is easy and everyone has complete control to their data (even though it’s only an ID)
  3. Didn’t I just talk about two? Ok, I think there are probably more than that, there could be something like “Sync”-Mode.. a User can write an offer in a public realm, stating he wants to share his shopping list with a user with username “xy”, the App of user “xy” could react upon that offer and publish its UserId.

By the way: When you are using an external Authentication (like an Identity-Server or similar) that offers a JWT-Token, the UserId will be the same as the Username.

Performance of loading Xaml dynamically in Xamarin.Forms

As I mentioned in a previous post, you can quite easily load Xaml dynamically in your Xamarin.Forms App. But how about performance? How long does it take in comparison to “regular” loading of pre-compiled Xaml.

It’s anything but easy to really measure this. We could eventually use LoadFromXaml and measure the differences. I decided to create DataTemplates and use the CreateContent() method to create the actual Control.

<DataTemplate x:Key="Test1">
<Grid>
    <Grid.RowDefinitions>
        <RowDefinition Height="auto" />
        <RowDefinition Height="*" />

    </Grid.RowDefinitions>
    <Label Text="Hello World!" />
    <Button Grid.Row="1" Text="Press me" />
</Grid>
</DataTemplate>
<DataTemplate x:Key="Test2">
    <dynamiccontrol:XamlView>
        <dynamiccontrol:XamlView.Xaml>
            <![CDATA[
            <Grid>
                <Grid.RowDefinitions>
                    <RowDefinition Height="auto" />
                    <RowDefinition Height="*" />

                </Grid.RowDefinitions>
                <Label Text="Hello World!" />
                <Button Grid.Row="1" Text="Press me" />
            </Grid>
            ]]>
        </dynamiccontrol:XamlView.Xaml>
    </dynamiccontrol:XamlView>
           
</DataTemplate>

You can see that the Xaml is quite easy, but loading it dynamically takes over 20 times longer than compiled Xaml.

I tried to create 10,000 controls and measured the following values:
Compiled Xaml: 5.8s
Dynamic Xaml: 133.1s

I know the test is not very representative, but you should always keep in mind that there may be a performance problem when using this method. Especially when you want to create dynamic Layouts in ListViews.

You can slightly boost performance (5-10%), when you load the whole DataTemplate from Xaml, and then create the Control with it.

Dynamic DataTemplate: 124s

Never ever use Task.Result in Xamarin.Forms! Why?

I recently stumbled over a deadlock in our code. Someone called a method, that returned a Task, and instead of awaiting it, he called:

var res = Method().Result;

I reason for this code was just plain laziness, because using await requires an async-context, which probably isn’t that easy to achieve. But what’s the reason for that deadlock, and why is awaiting the result actually resolving it?

I don’t want to dick very deeply into the Task Parallel Library (TPL). But let’s just make clear, what a task is. A task is a “unit of execution”, it has no direct link to Threads (even though it’s in the same namespace). A Thread can run tasks, there can be one or more Threads in your program. Let’s assume that Threads run in parallel.

So now let’s make up some setting, we call a method (which returns and starts a Task, that’s what “async Task” does) and then wait for the result by calling “.Result”. That call will actually block the current thread and wait for the second task to finish.

Result is working

When we look at the graphic above, we see that this call is working. We actually block Thread 1, but we have not created a deadlock. But we can never be sure, that the TaskScheduler (it is planning what Tasks runs on which Thread) really runs Task2 on Thread2. As soon as the TaskScheduler decides to run Task2 on Thread1, we have a classic deadlock:

DeadlockTask

But what is the difference to async/await pattern?

A couple of years ago, a friend described async-await pattern as syntactical sugar, it’s not a language feature, nor a real pattern. There is something true to that, but it makes programming Tasks so much easier. It actually splits your code into separate parts, and calls them in a sequence. So there will be no busy wait, no matter which Thread the Task we are waiting for is executed on.

TaskAsyncAwait

Dynamically create controls in Xamarin Forms

This is a very broad topic. You can actually always dynamically create controls in code behind, by just adding them to the UI during runtime. This is very easy, but it’s not generic at all, you need to code everything you would actually do in Xaml.

Another solution (which I actually prefer) is to use a ListLayout (maybe a Bindable StackLayout) and use a TemplateSelector to switch between pre defined DataTemplates based on the ViewModel, that is being used. But this will actually not give you more flexibility, but it’s definitely a better solution than the first shot.

We actually want something really flexible, we try to achieve instanciating an unknown Xaml from whatever source we have (Text, Internet, UserInput,.. ), and even provide binding to further use the UserInput in ViewModel. So there are 2 parts to this:
1. load xaml during runtime,
2. somehow achieve binding.

When you have a look in your obj-folder of a compiled Xamarin app, you will find a file called something like “MainPage.xaml.g.cs”

[global::Xamarin.Forms.Xaml.XamlFilePathAttribute("MainPage.xaml")]
    public partial class MainPage : global::Xamarin.Forms.ContentPage {
        
        [global::System.CodeDom.Compiler.GeneratedCodeAttribute("Xamarin.Forms.Build.Tasks.XamlG", "2.0.0.0")]
        private void InitializeComponent() {
            global::Xamarin.Forms.Xaml.Extensions.LoadFromXaml(this, typeof(MainPage));
        }
    }

There is another overload of the global extension function Xamarin.Forms.Xaml.Extensions.LoadFromXaml(..) which takes a string representation of your xaml to create a control.

We can use this, to create a ContentControl with a BindableProperty, which creates the given Xaml at runtime.

public class XamlView : ContentView
{
       
    public static readonly BindableProperty XamlProperty =
                            BindableProperty.Create(nameof(Xaml), typeof(string), typeof(XamlView), propertyChanged: OnXamlChanged);

    private static void OnXamlChanged(BindableObject bindable, object oldValue, object newValue)
    {
        try
        {
            var xamlView = (XamlView)bindable;
            ContentView view = new ContentView();
            // we add the default xaml namespace to our surrounding ContentView,
            // so it doesn't need to be defined in xaml
            view = view.LoadFromXaml("" +
                (xamlView.Xaml ?? string.Empty) +
                "");
            xamlView.Content = view;
        }
        catch (Exception ex)
        {
            // we should actually handle that exception, maybe put it on the screen as label
        }
    }

    public string Xaml
    {
        get => (string)GetValue(XamlProperty);
        set => SetValue(XamlProperty, value);
    }
}

usage:

<Grid BackgroundColor="Red">
    <Grid.RowDefinitions>
        <RowDefinition Height="*" />
        <RowDefinition Height="*" />
    </Grid.RowDefinitions>
    <Entry x:Name="XamlEditor" Text="{Binding ContentXaml}" />
    <dynamiccontrol:XamlView
        Grid.Row="1"
        Xaml="{Binding ContentXaml}" />
</Grid>

You could also bind the XamlView.Xaml directly to an Entry.Text using ReferenceBinding, but I prefer using a ViewModel instead.

And this is how it looks like:
XamlView

In my next post, I will talk about binding the Data from the XamlView to a ViewModel.

Move Controls in Xamarin.Forms App with your finger

…or Mouse.. or Pen.. or nose, whatever you like. In WPF this is very easy accomplished, because Drag&Drop is a main UI feature in Windows. Each OS implements this feature slightly different, that’s why there is no such generic solution for all platforms. Microsoft proposes a solution called TouchEffect, which implements a specific Effect for each platform. (https://docs.microsoft.com/de-de/xamarin/xamarin-forms/app-fundamentals/effects/touch-tracking)

But there is still another and quite simple solution, you can use gestures (esp. the PanGesture) for that, with slight limitations.

MoveViewXamarin

The PanGesture

The PanGesture is actually a touch based Drag&Drop. You put the finger down on the screen and moved it around until you raise your finger. The PanGesture will always fire it’s event while the finger is moving around and will be quitted with the coordinates (0,0)

The Implementation

The implementation is quite simple, actually there are only a few lines of code:
1. when panning starts: save current Translation of View
2. while panning: set translation to the starting value + panning value
3. when panning finished: reset variable for starting value

Developers are lazy people, we don’t want to copy that implementation on every View. So the trick is, to use an attached property, so we can use it on every View and even bind it to a ViewModel.

The Code

public static class MoveView
{
    #region attached properties: CanMove
    public static readonly BindableProperty CanMoveProperty =
            BindableProperty.CreateAttached("CanMove", typeof(bool), typeof(View), false,
                propertyChanged: OnCanMoveChanged);

    private static void OnCanMoveChanged(BindableObject bindable, object oldValue, object newValue)
    {
        if ((bool)newValue && bindable is View view)
        {
            PanGestureRecognizer pangest = new PanGestureRecognizer();
            pangest.PanUpdated += Pangest_PanUpdated;
            view.GestureRecognizers.Add(pangest);
        }
    }
    public static bool GetCanMove(BindableObject bindable)
    {
        return (bool)bindable.GetValue(CanMoveProperty);
    }

    public static void SetCanMove(BindableObject bindable, bool value)
    {

        bindable.SetValue(CanMoveProperty, value);
    }
    #endregion

    // saves the translation state on start, it's okay to have it static
    // because we can only move one item at a time
    static Point? _translationStart = null;
    private static void Pangest_PanUpdated(object sender, PanUpdatedEventArgs e)
    {
        if (sender is View view)
        {
            if (e.TotalX == 0 && e.TotalY == 0)
            {
                // movement has end, reset
                _translationStart = null;
            }
            else
            {
                if (_translationStart == null)
                {
                    (view.Parent as Layout)?.RaiseChild(view);
                    _translationStart = new Point(view.TranslationX, view.TranslationY);
                }
                view.TranslationX = e.TotalX + _translationStart.Value.X;
                view.TranslationY = e.TotalY + _translationStart.Value.Y;
            }

        }
    }
}

Usage

 <Frame BorderColor="Red" BackgroundColor="Bisque"
                   dashboard:MoveView.CanMove="True"
                   HeightRequest="100" VerticalOptions="Center"
                 />

Limitations

– only when the parent is a layout, it will raise the View that is moved to the topmost position (only in respect to the parent, not overall)
– you can simply move the View outside of its parent, but then you will not be able to move it back in

Please feel free to use the code and change it as you like. If you find bugs, you may fix them. I would also be happy if you leave me some notes.

Xamarin.Forms FlowLayout

Motivation

I recently faced the challenge to add Items of different sizes to a Page on a Xamarin.Forms App. The result should be some kind of a Dashboard with Diagrams and info boxes on it. Some diagrams are smaller, some bigger.

The first thing, that came in mind, was a FlexLayout, but this looks a little bit odd to me, because the controls on the main axis share the same size in the secondary axis. That is okay if all controls have the same height or width, but this is not the case.

FlexLayout Xamarin.Forms App

But what I actually want is something like this:

FlowLayout - Xamarin.Forms App

It’s very tough to arrange the children of a Layout, when every control has a free size defined. To solve this problem, we need to divide the available area in uniform sections. Using this approach, each control can define it’s size in units, and will be placed on the next available free spot.

Simulator Screen Shot - iPhone 11 - 2020-02-20 at 22.30.18

The Algorithm

  1. The FlowLayout needs a UnitSizeRequested in pixels, we need to calculate how many items can fit vertically and horizontally based on a size of a unit. Afterwards we need to find the actual UnitWidth and UnitHeight so that the whole area of the control is used.
  2. There need to be two attached properties for the child elements, so each element can specify its HorizontalUnits and VerticalUnits.
  3. Finally we create an array as a representation of the FlowLayout so we can arrange the Controls on it.

The Code

using System;

using Xamarin.Forms;

namespace Dashboard
{
    public class FlowLayout : AbsoluteLayout
    {
        #region attached properties: HorizontalUnitsProperty
        public static readonly BindableProperty HorizontalUnitsProperty =
                BindableProperty.CreateAttached("HorizontalUnits", typeof(int), typeof(FlowLayout), 1);
        public static int GetHorizontalUnits(BindableObject view)
        {
            return (int)view.GetValue(HorizontalUnitsProperty);
        }

        public static void SetHorizontalUnits(BindableObject view, int value)
        {
            view.SetValue(HorizontalUnitsProperty, value);
        }
        #endregion
        #region attached properties: VerticalUnitsProperty
        public static readonly BindableProperty VerticalUnitsProperty =
                BindableProperty.CreateAttached("VerticalUnits", typeof(int), typeof(FlowLayout), 1);

        public static int GetVerticalUnits(BindableObject view)
        {
            return (int)view.GetValue(VerticalUnitsProperty);
        }

        public static void SetVerticalUnits(BindableObject view, int value)
        {
            view.SetValue(VerticalUnitsProperty, value);
        }
        #endregion

        #region properties
        public double UnitSizeRequested { get; set; } = 100;
        public double UnitWidth { get; private set; }
        public double UnitHeight { get; private set; }
        #endregion
       

        protected override void OnSizeAllocated(double width, double height)
        {
            // when the control allocates the size, we will arrange the children
            base.OnSizeAllocated(width, height);
            if (width>0 && height>0)
            {
                ArrangeChildren();
            }
        }


        public void ArrangeChildren()
        {
            // do the calculation (step 1)
            int horizontalUnitCount = (int)(Width / UnitSizeRequested);
            int verticalUnitCount = (int)(Height / UnitSizeRequested);
            bool[,] dashArray = new bool[horizontalUnitCount, verticalUnitCount];
            UnitWidth = UnitSizeRequested + (Width % UnitSizeRequested) / horizontalUnitCount;
            UnitHeight = UnitSizeRequested + (Height % UnitSizeRequested) / verticalUnitCount;
            foreach (var child in Children)
            {
                // for each child - find the 
                var rect = FindFreeRectangle(dashArray, GetHorizontalUnits(child), GetVerticalUnits(child));
                if (rect != null)
                {
                    AbsoluteLayout.SetLayoutBounds(child, rect.Value);
                }
                else
                {
                    // this control can not be placed ... so just skip it
                    AbsoluteLayout.SetLayoutBounds(child, new Rectangle(0, 0, 0, 0));
                }

            }
        }

        private Rectangle? FindFreeRectangle(bool[,] dashArray, int xCount, int yCount)
        {
            Rectangle res;
            for (int y = 0; y  dashArray.GetLength(1)
                )
                return false;

            for (int xx = x; xx < x + xCount; xx++)
            {
                for (int yy = y; yy < y + yCount; yy++)
                {
                    if (dashArray[xx, yy] == true)
                        return false;
                }
            }
            // now reserve fields
            for (var xx = x; xx < x + xCount; xx++)
            {
                for (var yy = y; yy < y + yCount; yy++)
                {
                    dashArray[xx, yy] = true;
                }
            }
            return true;
        }

      
    }
}

Caution: This code is not complete, perhaps you can not use it with the BindableLayout-Extension. Feel free to copy the code and change it as needed. Be careful in choosing the right UnitSizeRequested, a small unit will probably result in a rather bad performance.

Usage

<FlowLayout BackgroundColor="Black" >
        <Frame BorderColor="Yellow" BackgroundColor="Gray" CornerRadius="0" 
                FlowLayout.HorizontalUnits="1"
                FlowLayout.VerticalUnits="1"
                 />
        <Frame BorderColor="Gray" BackgroundColor="HotPink" CornerRadius="0" 
                FlowLayout.HorizontalUnits="1"
                FlowLayout.VerticalUnits="1"
                 />
        <Frame BorderColor="Blue" BackgroundColor="Honeydew" CornerRadius="0" 
                FlowLayout.HorizontalUnits="1"
                FlowLayout.VerticalUnits="1"
                 />
        <Frame BorderColor="Red" BackgroundColor="Bisque" CornerRadius="0" 
                FlowLayout.HorizontalUnits="4"
                FlowLayout.VerticalUnits="1"
                 />
        <Frame BorderColor="Green" BackgroundColor="CadetBlue" CornerRadius="0" 
                FlowLayout.HorizontalUnits="3"
                FlowLayout.VerticalUnits="3"
                 />
</FlowLayout>

Adding Themes to Xamarin.Forms App

I just want to make some short notes about themes in Xamarin.Forms Apps, since there are already a lot of tutorials available online, that go way deeper.

Themes
Themes are actually ResourceDictionaries. Each atomic type you use in your XAMLs and Styles, will be defined here. Types are f.e. Color, Double (for font sizes), etc.

<ResourceDictionary xmlns="http://xamarin.com/schemas/2014/forms"
                    xmlns:x="http://schemas.microsoft.com/winfx/2009/xaml"
                    x:Class="ShoppingList.Themes.DarkTheme">
    <Color x:Key="BackgroundColor">#333333</Color>
    <Color x:Key="TextColor">#eeeeee</Color>
    <Color x:Key="PlaceholderTextColor">#55ffffff</Color>
    <Color x:Key="ControlBackground">#111111</Color>
    <Color x:Key="ButtonBackgroundColor">#11ffffff</Color>
</ResourceDictionary>

Be sure to have a code behind file for your ResourceDictionary, that calls InitializeComponent(). Otherwise this will only work on UWP (without .NET Toolchain) and no other platforms.

Styles
In most cases the styles are not part of your themes, because using themes just makes you change the look of your pages and controls, not the styling of specific controls. Perhaps styles are using the resources, that you define in your theme. Be sure to use DynamicResource for linking to the key of the resource, otherwise you can not change themes during runtime. (Restart will be needed)

<ResourceDictionary xmlns="http://xamarin.com/schemas/2014/forms"
                    xmlns:x="http://schemas.microsoft.com/winfx/2009/xaml"
                    x:Class="ShoppingList.Resources.Styles">
    <Style TargetType="NavigationPage">
            <Setter Property="BackgroundColor" Value="{DynamicResource BackgroundColor}"/>
            <Setter Property="BarBackgroundColor" Value="{DynamicResource BackgroundColor}"/>
            <Setter Property="BarTextColor" Value="{DynamicResource TextColor}"/>
            
        </Style>
        <Style TargetType="Label">
            <Setter Property="TextColor" Value="{DynamicResource TextColor}" />
        </Style>
        <Style TargetType="Entry">
            <Setter Property="BackgroundColor" Value="{DynamicResource ControlBackground}" />
            <Setter Property="TextColor" Value="{DynamicResource TextColor}" />
            <Setter Property="PlaceholderColor" Value="{DynamicResource PlaceholderTextColor}" />
        </Style>
        <Style TargetType="Button">
            <Setter Property="TextColor" Value="{DynamicResource TextColor}" />
            <Setter Property="BackgroundColor" Value="{DynamicResource ButtonBackgroundColor}" />
            
        </Style>
</ResourceDictionary>

Changing the theme
Now you just need to add the following code to your App.xam.cs, then you can just call App.SetTheme(typeof(DarkTheme)) to change the theme during runtime.

Be sure to add all your style-ResourceDictionaries and a standard theme to your App.xaml in the Application.Resources-Section

internal static void SetTheme(Type themeType)
{
   Preferences.Set("Theme", themeType.FullName);
   var resDict = (ResourceDictionary)Activator.CreateInstance(themeType);
   App.Current.Resources.MergedDictionaries.Add(resDict); // this line replaces all keys of the current dictionary with the value of the selected dictionary, only the keys that are present in the selected dictionary will be replaced
}

In your “OnInitialize” method of your App.xaml.cs you can put the following code, to load the saved theme on startup:

if (Preferences.ContainsKey("Theme"))
{
   var themeTypeName = Preferences.Get("Theme",null);
   var themeType = Type.GetType(themeTypeName);
   if (themeType != null)
   {
      SetTheme(themeType);
   }
}

CSC : error CS1703: Multiple assemblies with equivalent identity have been imported (iOS)

I recently encountered a problem compiling my Xamarin.Forms iOS project. Everything worked well when testing the UWP App during development, but when I tried to test the iOS project, the compiler threw the following error:

CSC : error CS1703: Multiple assemblies with equivalent identity have been imported (iOS)'[..]\packages\system.reflection.emit\4.3.0\ref\netstandard1.1\System.Reflection.Emit.dll’ and ‘C:\Program Files (x86)\Microsoft Visual Studio\2019\Professional\Common7\IDE\ReferenceAssemblies\Microsoft\Framework\Xamarin.iOS\v1.0\Facades\System.Reflection.Emit.dll’. Remove one of the duplicate references.

 
Checking those two files mentioned, you’ll find out, that those have two different versions (nuget cache: 4.3.0, VisualStudio: 4.0.0), also the path (and file size) states, that the file from the VisualStudio folder is only a facade.

The solution is quite simple, just add a package reference to your project-file excluding all assets:

<PackageReference Include="System.Reflection.Emit" Version="4.3.0">
  <ExcludeAssets>all</ExcludeAssets>
</PackageReference>

.. just add it in an ItemGroup block with other package references and you solved that issue.